Battery switch on travel trailer function is crucial for managing your RV’s power. This guide dives into the hows and whys of these switches, covering different types, installation, troubleshooting, and maintenance. We’ll explore everything from basic operation to advanced techniques for maximizing your trailer’s electrical system efficiency and safety. Whether you’re a seasoned RVer or a first-timer, understanding your battery switch is key to a smooth and enjoyable camping experience.
We’ll break down the different types of switches, show you how to connect and disconnect batteries safely, and troubleshoot common problems. We’ll also cover integrating your battery switch with other RV electrical components like your solar panels and converter. By the end, you’ll be confident in managing your travel trailer’s power system.
Understanding Battery Switch Functionality in Travel Trailers
Your travel trailer’s battery switch is a crucial component for managing your power sources. It allows you to control the flow of electricity from your trailer’s batteries to various systems, and to disconnect the batteries entirely for safety or storage. Understanding its function is key to maintaining your trailer and preventing electrical problems.Battery switches serve the essential purpose of controlling power flow to and from your travel trailer’s batteries.
This prevents accidental drain, protects against short circuits, and enables convenient switching between different power sources. Proper use ensures your batteries last longer and your electrical systems function reliably.
Types of Battery Switches
Several types of battery switches are used in travel trailers, each offering different levels of control. The choice depends on the number of batteries and the level of control needed.
- Single Battery Switch: This simple switch connects or disconnects a single battery from the trailer’s electrical system. It’s suitable for trailers with only one battery.
- Dual Battery Switch: This switch controls two batteries, typically allowing you to select either battery individually, both batteries together, or to disconnect both completely. This provides more flexibility and longer runtime.
- Selector Switch: More complex selector switches can manage more than two batteries, and sometimes incorporate additional features like a “battery combiner” to charge batteries in parallel.
Internal Workings of a Battery Switch
A typical battery switch uses a rotary mechanism with multiple positions. Each position corresponds to a different circuit configuration, connecting or disconnecting the battery terminals. The switch itself contains robust internal contacts designed to handle high amperage. A well-designed switch incorporates safety features like a positive “off” position, ensuring complete isolation of the battery from the trailer’s electrical system.
So, you’re prepping for your next adventure in your travel trailer? Awesome! First things first: make sure you understand the battery switch on travel trailer function – it’s crucial for keeping your lights and appliances running. Once you’ve got that sorted, think about travel insurance. Protecting your trip with something like Aon travel insurance gives you peace of mind knowing you’re covered for unexpected events.
This way, you can focus on enjoying the open road without worrying about unforeseen costs.
Internal components are usually made of materials resistant to corrosion and high temperatures.
Operating a Battery Switch
Correct operation of your battery switch is vital for both safety and efficient power management. The exact steps may vary slightly depending on the switch’s design, but the general principles remain consistent.
- Identify the Switch Positions: Familiarize yourself with the markings on your switch. Common positions include “Off,” “Battery 1,” “Battery 2,” “Both,” or similar designations.
- Turn the Switch to the “Off” Position: Before performing any maintenance or disconnecting the trailer from shore power, always start by turning the switch to the “Off” position. This completely isolates the batteries.
- Select the Desired Position: Once the batteries are isolated, rotate the switch to the desired position (“Battery 1,” “Battery 2,” “Both,” etc.) to connect the appropriate battery or batteries to the trailer’s electrical system.
- Verify Power: After switching, check the functionality of your appliances and lights to ensure the selected battery or batteries are providing power.
Connecting and Disconnecting Batteries
Connecting and disconnecting your travel trailer batteries correctly is crucial for safety and the longevity of your battery system. Improper connections can lead to sparks, corrosion, and even damage to your electrical system. This section details best practices to ensure a smooth and safe process.Proper grounding and cable management are equally important for optimal performance and safety. A well-maintained battery system will minimize voltage drops, reduce the risk of corrosion, and extend the life of your batteries and wiring.
This section will also Artikel potential hazards to avoid.
Battery Connection and Disconnection Procedures
When connecting or disconnecting batteries, always begin by turning off any appliances or devices that draw power from the battery system. This prevents accidental shorts or sparks. Next, carefully connect or disconnect the cables, ensuring a secure and firm connection. Start with the positive (+) terminal and then connect the negative (-) terminal. When disconnecting, reverse this process, removing the negative cable first.
So, you’re prepping for your awesome travel trailer adventure? First things first: understand your battery switch on travel trailer function – it’s crucial for keeping your lights and appliances running. Knowing how to use it properly will save you headaches down the road. And speaking of prepping, don’t forget travel insurance! Consider checking out Aon travel insurance for peace of mind; it’s a smart move before you hit the road.
You’ll want to be covered for any unexpected issues, making your trip truly carefree.
Always use appropriately sized wrenches or tools to avoid damaging the terminals. Inspect the terminals and cables for corrosion; clean them with a wire brush if necessary.
Grounding and Cable Management
Proper grounding is essential for the safe and efficient operation of your battery system. The negative (-) battery terminal should be connected to a clean, unpainted metal surface on your travel trailer’s chassis. This provides a reliable ground path for the electrical current. Use heavy-gauge, marine-grade wiring to minimize voltage drop and ensure a secure connection. Route cables neatly and securely using cable ties or clamps to prevent chafing or accidental disconnections.
Avoid running cables near sharp edges or hot surfaces.
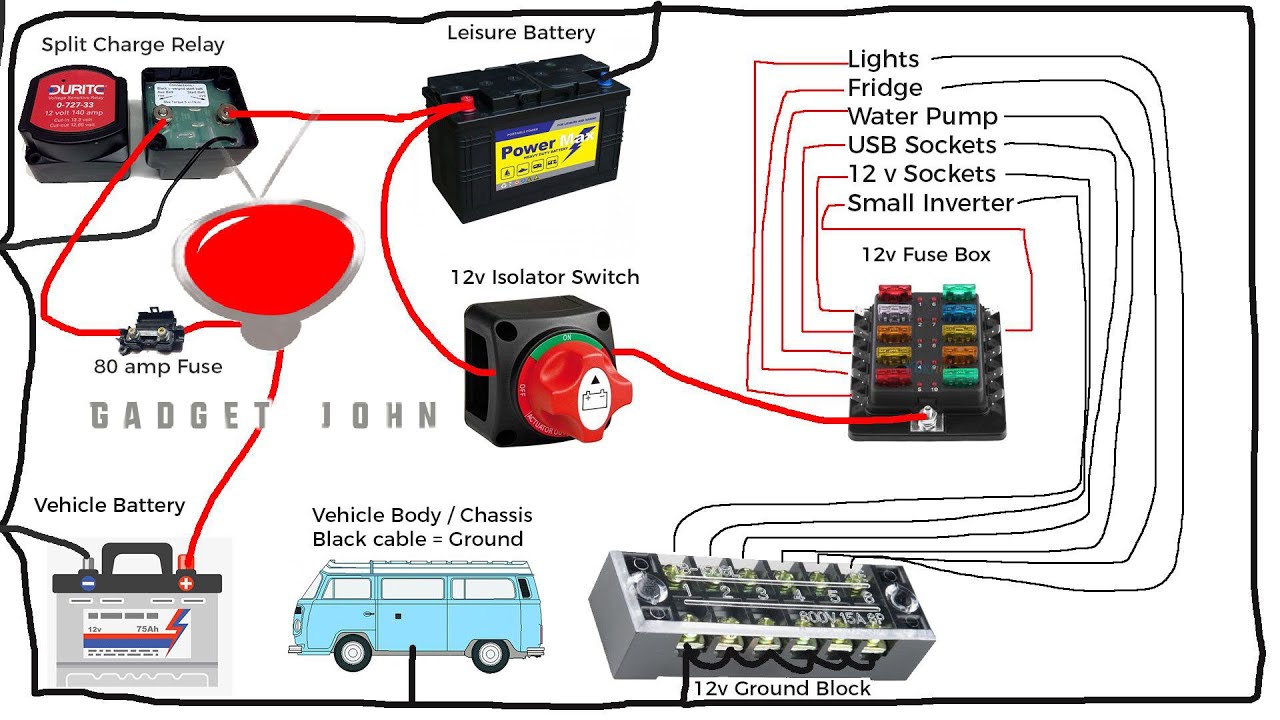
Dual-Battery System Wiring Diagram
Imagine a diagram showing two batteries (Battery 1 and Battery 2) each with a positive (+) and negative (-) terminal. A heavy-gauge wire connects the positive terminal of each battery to a battery switch. This switch has three terminals: a positive input (connected to the two battery positives), a positive output (leading to the trailer’s electrical system), and a negative terminal (common to both batteries).
A heavy-gauge wire connects the negative terminal of each battery to the negative terminal of the switch. A separate heavy-gauge wire runs from the negative terminal of the switch to a clean, unpainted metal surface on the trailer’s chassis (ground). The positive output from the switch powers the trailer’s 12V system. This ensures both batteries can power the system, and the switch controls which battery or both are powering the system.
Safety Hazards of Incorrect Battery Connections
Incorrect battery connections can pose several safety hazards:
- Sparks and Fire: Connecting positive and negative cables incorrectly can create a short circuit, leading to sparks and potentially a fire.
- Battery Explosion: Hydrogen gas, produced during battery operation, is highly flammable. A spark near the battery can ignite this gas, causing an explosion.
- Corrosion: Poor connections can lead to corrosion on the battery terminals and cables, reducing their lifespan and conductivity.
- Electrical Damage: Incorrect connections can damage the trailer’s electrical system, including sensitive electronics.
- Personal Injury: Sparks, explosions, and acid burns are potential hazards associated with improper battery handling.
Troubleshooting Common Battery Switch Issues
Your travel trailer’s battery switch is a critical component, ensuring you can seamlessly switch between your trailer’s battery and shore power. Problems with this switch can leave you stranded without power, so understanding common issues and how to troubleshoot them is essential. This section will cover common problems, their causes, and effective solutions.
Battery Switch Problems and Troubleshooting Steps
Several issues can arise with your battery switch. These often manifest as a complete lack of power, intermittent power surges or failures, or even physical overheating of the switch itself. Let’s examine these scenarios and how to approach them systematically.No Power: If you’re experiencing a complete absence of power, the first step is to check the switch’s position.
Ensure it’s correctly set to the position that should provide power to your appliances. Next, verify that the batteries are adequately charged and connected securely. A simple voltage check with a multimeter will confirm this. If the batteries and connections are fine, inspect the switch itself for any signs of damage, corrosion, or loose wiring. Finally, consider checking the fuses or circuit breakers in the system.Intermittent Power: Intermittent power usually points to a loose connection somewhere in the circuit.
Start by carefully inspecting all wire connections at the battery switch, both input and output. Pay close attention to any signs of corrosion or damage. If the problem persists, you may need to check the wiring harness leading to the appliances. A faulty switch itself can also cause intermittent problems.Overheating: A battery switch that’s overheating is a serious issue that demands immediate attention.
This is often a sign of a high-current draw, perhaps due to a short circuit somewhere in the system. Turn off all appliances immediately to reduce the load. Then, thoroughly inspect all wiring for shorts or damage. If you find any damaged wiring, repair or replace it before using the switch again. If overheating persists, the switch itself may be faulty and require replacement.
Potential Causes of Faulty Battery Switches
Faulty battery switches can stem from several sources. These include corrosion on the terminals, which can impede current flow and lead to overheating. Loose wiring connections can also cause intermittent power issues or complete power failure. Over time, the internal components of the switch can wear out, leading to malfunctions. Finally, a short circuit anywhere in the system will put an excessive load on the switch, potentially causing overheating and failure.
Regular inspection and maintenance can significantly reduce the likelihood of these problems.
Common Battery Switch Malfunctions: Symptoms, Causes, and Solutions
| Symptom | Potential Cause | Solution |
|---|---|---|
| No power to appliances | Switch in incorrect position, dead batteries, loose connections, blown fuse/breaker | Check switch position, test battery voltage, tighten connections, check/replace fuse/breaker |
| Intermittent power | Loose connections, corroded terminals, failing switch | Tighten connections, clean terminals, replace switch |
| Overheating switch | Short circuit, excessive current draw, faulty switch | Inspect wiring for shorts, turn off appliances, replace switch |
| Switch feels “sticky” or difficult to operate | Corrosion, internal mechanical failure | Clean terminals, replace switch |
Battery Switch and Electrical System Integration

Your battery switch is the central nervous system of your travel trailer’s DC power, connecting and disconnecting your house batteries from the rest of the electrical system. Understanding how it interacts with other components is crucial for safe and efficient power management.The battery switch acts as a master control, directing power flow from your batteries to various appliances and systems.
When the switch is on, power flows to the converter, which transforms 12V DC battery power into 120V AC power for household items. Simultaneously, it supplies power to 12V DC appliances directly. An inverter, if present, draws power from the batteries to convert 12V DC to 120V AC for higher-power appliances. Solar panels, when connected, charge the batteries through a charge controller, often bypassing the battery switch (although some setups integrate them through the switch).
Essentially, the switch acts as the primary on/off for the battery’s direct contribution to the trailer’s electrical demands.
Benefits of Using a Battery Switch
A battery switch offers several key advantages. Firstly, it provides a convenient method to completely disconnect your house batteries from the rest of the trailer’s electrical system. This is vital for preventing battery drain when the trailer is stored for extended periods or to avoid potential short circuits during maintenance. Secondly, it allows for the selection of different battery banks (if multiple are installed), enabling independent management and charging of separate battery systems.
This is particularly useful in trailers with dual battery setups, allowing you to isolate a starting battery from a house battery bank. Finally, it simplifies troubleshooting by enabling the isolation of the battery system for diagnostics and repairs. Without a switch, disconnecting the batteries often requires physically disconnecting cables, a more time-consuming and potentially hazardous process.
The Role of Fuses and Circuit Breakers
Fuses and circuit breakers are essential safety devices that protect your battery system and the entire electrical system of your travel trailer from damage caused by overcurrent situations. Fuses are one-time use devices that melt and break the circuit when excessive current flows through them. Circuit breakers, on the other hand, are reusable devices that automatically trip when an overload occurs, and can be reset once the fault is cleared.
Both are usually strategically placed throughout the system – often near the battery, at the battery switch, and within individual circuits feeding appliances. They prevent fires, damage to wiring, and protect your valuable batteries from being damaged by excessive current draw.
Proper Fusing of a Battery Switch Installation
Proper fusing is critical for safety. The fuse or circuit breaker protecting the battery switch should have an amperage rating appropriate for the maximum current draw of the entire battery bank and any connected components. This rating should be clearly stated on the switch and in the manufacturer’s instructions. For example, a 100 amp-hour battery bank might require a 75-amp fuse or circuit breaker, allowing for a safety margin and preventing overloading.
Never use a fuse or circuit breaker with a rating lower than recommended. Additionally, always replace a blown fuse with one of the same rating. Using a higher-rated fuse could lead to serious damage or fire if a short circuit occurs. The fuse should be installed in the positive (+) wire, close to the battery, as a first line of defense.
Maintenance and Care of Battery Switches: Battery Switch On Travel Trailer Function
Keeping your travel trailer’s battery switch in top condition is crucial for reliable power and to prevent costly repairs down the road. Regular maintenance ensures a long lifespan for your switch and avoids frustrating breakdowns while you’re enjoying your adventures. Neglecting this simple task can lead to corrosion, poor connections, and even potential fire hazards.Regular Maintenance Schedule for Battery SwitchesA simple, regular maintenance schedule can significantly extend the life of your battery switch.
We recommend a visual inspection at least every three months, and a more thorough cleaning and inspection at least once a year, or more frequently if you frequently travel in harsh environments (like coastal areas with high salinity). This schedule should be adjusted based on your usage and the environmental conditions your trailer is exposed to. More frequent checks are better than less frequent ones, especially if you notice any unusual signs.
Cleaning and Inspecting Battery Switch Terminals
Clean battery terminals are essential for a good electrical connection. Corrosion buildup can significantly impede current flow, leading to reduced battery performance and potential damage to the switch itself. To clean the terminals, you’ll need a wire brush (preferably a brass one to avoid scratching), baking soda, and water. First, disconnect the batteries from the switch. Then, use the wire brush to thoroughly scrub away any corrosion from both the terminals on the switch and the battery posts.
Next, make a paste of baking soda and water and apply it to the terminals, letting it sit for a few minutes to help neutralize any acid residue. Finally, rinse the terminals with clean water and allow them to dry completely before reconnecting the batteries. Pay close attention to any signs of damage, such as loose connections, cracks, or melting.
Preventing Corrosion and Damage
Corrosion is the biggest enemy of your battery switch. To minimize corrosion, apply a thin layer of dielectric grease to the battery terminals and switch contacts after cleaning. This grease acts as a barrier, preventing moisture and oxygen from reaching the metal surfaces. Additionally, ensure your battery box is properly sealed to prevent water ingress. Regularly check for any signs of moisture or leaks in the battery compartment.
Consider using a battery terminal protector, which fits over the terminals to keep them clean and dry. Storing your travel trailer in a dry place when not in use also helps significantly.
Recommended Maintenance Tasks, Battery switch on travel trailer function
- Visually inspect the battery switch and terminals every three months for signs of corrosion, damage, or loose connections.
- Clean and inspect the battery switch terminals at least once a year, or more frequently as needed.
- Apply dielectric grease to the battery terminals and switch contacts after cleaning.
- Ensure the battery box is properly sealed to prevent water ingress.
- Check for any signs of moisture or leaks in the battery compartment.
- Consider using battery terminal protectors.
- Store your travel trailer in a dry place when not in use.
Mastering your travel trailer’s battery switch is about more than just turning power on and off; it’s about ensuring safe and reliable operation of your entire electrical system. By understanding the different types of switches, proper connection techniques, troubleshooting steps, and regular maintenance, you can prevent costly repairs and enjoy worry-free adventures. So, take charge of your RV’s power and hit the road with confidence!
Question & Answer Hub
What size battery switch do I need?
The correct amperage rating depends on your battery bank’s total amperage. Consult a qualified electrician or RV technician for the appropriate size for your specific setup.
How often should I clean my battery switch terminals?
Inspect and clean your terminals at least once a year, or more frequently if you notice corrosion or buildup. Use a wire brush and baking soda solution to clean them thoroughly.
My battery switch is making a clicking sound. What’s wrong?
A clicking sound often indicates a faulty switch or a problem with the wiring. Check your connections and fuses. If the problem persists, consult a professional.
Can I use a battery switch with a solar panel system?
Yes, but proper wiring and configuration are crucial. A qualified technician can help ensure safe and efficient integration.
